Search This Blog Post

Tablet ver-Q88D-V1.1 Tested Rom Tablet Flash Done By AzimBahar

PCB IMAGE


Q88D-V1.1 (Tested Rom) Tablet Flash Done By AzimBahar
Rom Password - 0817655994
PCB Text -Q88D-V1.1 
Q88D-V1.1 Rom Link

SAMSUNG 300K TOOL TO FORCE ENTER DOWNLOAD MODE VIA USB

SAMSUNG 300K TOOL TO FORCE ENTER 
DOWNLOAD MODE VIA USB 
follow the instructions of the program

Only connect USB Cable to phone ON! 
- Android
- Bada
- Qualcomm Cpu
- Broadcom Cpu
- Etc :--))
DOWNLOAD LINK!
Samsung 300K Tool

Samsung Galaxy Mini 2 S6500D Restore Factory Hard Reset Remove Pattern Lock

Samsung Galaxy Mini 2 S6500D Restore Factory Hard Reset Remove Pattern Lock
Warning! All Data Will Be Lost!
It’s Very Easy…
1.Press Together Volume Up + Volume Down +home Button + Power Button
2.Release Your Fingers Of The Phone When Samsung Logo Appear
3.Choose With Volume Buutons “wipe Data/factory Reset”
4.Select With Home Button
5.Choose “yes” With Volume Button
6.Wait Tiil Format Is Complete
7.Select “Reboot”
Samsung Galaxy Mini 2 S6500D Restore Factory Hard Reset Format Phone.So lets start the Samsung Galaxy Mini 2 S6500D Restore Factory, Samsung Galaxy Mini 2 S6500D Hard Reset.Turn Off the mobile phone for few mints.Samsung Galaxy Mini 2 S6500D Remove Pattern Lock

Download LG G Pad 8.3 User Guide Manual Free

Download LG G Pad 8.3 User Guide Manual Free
LG Pad 8.3 T user manual guide – LG G-Pad 8.3 or also known as LG G-Pad V500 8.3 was announced in September 2013 , announced with 8.3 – inch screen and integrated with multimedia installation site and the IR port QREMOTE . The Pad 8.3 Tablet LG G is to navigate the support for the user to enter or read . LG G-Pad 8.3 tablet carry 5 – megapixel camera with autofocus , LED flash , image stabilizer, time to use the shot and VR panorama feature.
Download LG G Pad 8.3 User Guide Manual Free
LG Pad 8.3 T with the specifications and key features like fitted : 216.8 x 126.5 x 8.3 mm ( 8.54 x 4.98 x 0.33 inches ) in size with 338 g ( 11.92 ounces) for weight, 8.3 inch capacitive touchscreen with 16 million colors, 1200 x 1920 pixels screen with multi-touch support , microSD up to 64 GB , 16 GB internal memory , 2 GB RAM , stereo speakers , 5 – megapixel rear-facing camera with auto focus and LED flash, 1.3 megapixel front camera , run Android Jelly Bean OS 4.2.2 , 1.7, Qualcomm Snapdragon APQ8064 quad -core processor, Adreno 320 Pro 600 and Li-Ion 4600 mAh removable battery not supplied .
8.3 Manual LG G-Pad Brochure for download in pdf format with 9016 MB and contains 134 pages . The PDF manual LG G-Pad 8.3 explains the tool kits such as : Qpair , QSlide , Quick Memo , Remote Quick , Quick Translator , Voice companion , Polaris Office 5 others.
LG G Pad 8.3 user manual,LG G Pad 8.3 user guide manual,LG G Pad 8.3 user manual pdf‎,LG G Pad 8.3 user manual guide,LG G Pad 8.3 owners manuals online,LG G Pad 8.3 user guides,

Download Huawei Ascend G525 User Guide Manual Free

Download Huawei Ascend G525 User Guide Manual Free
Huawei Ascend G525 User guide – Acend Huawei G525 was released in November 2013 , with multimedia features such as capital and accessible . Huawei G525 is the latest series of Huawei series G- SIM card slots available to users. Huawei Ascend G525 comes with 4.5-inch touchscreen LCD display and a 5 megapixel camera with autofocus.
Download Huawei Ascend G525 User Guide Manual Free
Huawei Ascend G525 has the specifications and main features such as : 134 x 66.8 x 9.9mm (5.28 x 2.63 x 0.39 inches) in size with 155 g ( 5.47 oz ) in weight , 4.5 inch IPS LCD capacitive touchscreen 16M colors 540 x 960 pixels display with multi-touch support , microSD up to 32 GB, 4 GB internal memory , 1 GB of RAM , 5 megapixel rear-facing camera with autofocus, 0.3 megapixel front-facing camera running operating system Android 4.1 Jelly Bean to 1.2 GHz quad-core processor Qualcomm Snapdragon Adreno 203 MSM8225Q , powered Li-Ion 1700 mAh battery for up to 340 hours of standby time and up to 6 hours of talk time .
Huawei Ascend G525 Manual available for download in pdf format with 21.78 MB in size and contains 96 pages . In the manual pdf guide for explanations on Huawei applications such as : saving data to local storage and recovery of data from the local store .
Huawei Ascend G525 user manual,Huawei Ascend G525 user guide manual,Huawei Ascend G525 user manual pdf‎,Huawei Ascend G525 user manual guide,Huawei Ascend G525 owners manuals online,Huawei Ascend G525 user guides,

Download Sony Xperia C 2305 User Guide Manual Free

Download Sony Xperia C 2305 User Guide Manual Free
Sony Xperia C 2305 User Manual Guide – Sony Xperia C was launched in July 2013 with the dual SIM card slot and 5 – inch touchscreen. Sony Xperia C dual SIM card contains a SIM slot supports 3G ( WCDMA) and 2G ( GSM) and SIM 2 only supports 2G (GSM). Sony Xperia C + also known as the Sony Xperia C HSPA . The series Sony Xperia bring your camera 8MP main and runs Android 4.2.2 Jelly Bean same as the Xperia Z.
Download Sony Xperia C 2305 User Guide Manual Free
Sony Xperia C 2305 specifications and equipped with key features like : 141.5 x 74.2 x 8.9 mm (5.57 x 2.92 x 0.35 inches ) in size with 153 g (5.40 oz ) weight , 5.0 inches TFT capacitive touchscreen 16M colors 540 x 960 pixel display with up to 4-finger multi-touch screen , microSD up to 32 GB, 4 GB internal memory , 1 GB of RAM , 8 megapixel rear facing camera with autofocus and LED flash , VGA front camera as , Android Jelly Bean OS 4.2.2 running MediaTek MT6589 GHz quad- core processor PowerVR SGX544 1.2 , Li-Ion 2390 mAh battery provides up to 588 hours of standby time and up to 14 hours talk time.
2305 Sony Xperia C instruction booklet for download in pdf format with a size of 2.38 MB and contains 123 pages . The pdf Manual Sony Xperia C 2305 also in Spanish with a size of 2.36 MB and 128 pages.
Sony Xperia C 2305 user manual,Sony Xperia C 2305 user guide manual,Sony Xperia C 2305 user manual pdf‎,Sony Xperia C 2305 user manual guide,Sony Xperia C 2305 owners manuals online,Sony Xperia C 2305 user guides,

Samsung Galaxy Core I8262 Restore Factory Hard Reset Remove Pattern Lock

Samsung Galaxy Core I8262 Restore Factory Hard Reset Remove Pattern Lock
If You Forgot Your Screen Lock Combination Follow These Steps.
Warning!All Data Will Be Lost!
1.Power Off Your Phone
2.Press Together Volume Up + Home Button + Power Button Until The Phone Vibrates
3.Choose With Volume Buttons “wipe Data/factory Reset” And Select It With Power Button
4.Choose “yes” With Volume Buttons And Select It With Power Button
5.Wait Untiil Format Is Complete
6.Select “reboot”
7.Wait Until The Phone Restarts
That’s It!
Notice: The hard reset operation will delete anything that are saved in your phone’s internal memory, So make a backup of your data in case you can access them.
Samsung Galaxy Core I8262 Restore Factory Hard Reset Format Phone.So lets start the Samsung Galaxy Core I8262 Restore Factory, Samsung Galaxy Core I8262 Hard Reset.Turn Off the mobile phone for few mints.Samsung Galaxy Core I8262 Remove Pattern Lock.

Download ZTE Nubia 5 User Guide Manual Free

Download ZTE Nubia 5 User Guide Manual Free
ZTE Nubia 5 User guide – ZTE Nubia 5 was released in October 2013, the high quality of construction, thinner profile , high-resolution screen and LTE support capability . The ZTE Nubia 5 is high- end smartphone based Chinesse manufacturer for the U.S. market . The Nubia 5 Android 4.1.2 OS ZTE Jelly Bean term and Protect your screen with Corning Gorilla Glass .
Download ZTE Nubia 5 User Guide Manual Free
ZTE Nubia 5 with the specifications and key features like fitted : 137.9 x 68.6 x 7.36mm ( 5.43 x 2.7 x 0.29 inches) in size with 128 g ( 4.51 oz ), 5.0 – inch IPS LCD touchscreen display 16 million colors 1080 x 1920 pixel display with multi-touch display and Corning Gorilla Glass protection , 16 GB internal memory , 2 GB RAM , 13 – megapixel rear-facing camera with autofocus and LED flash , 2- megapixel camera with other Android Jelly Bean OS 4.1.2 , not powere 1.5GHz quad-core APQ8064 processor and Adreno 320 Li-Ion 2300 mAh removable battery.
5 Nubia ZTE Manual available for download in pdf format with 207 KB and contains pages. The pdf manual ZTE Nubia 5 is simple and explained on the basis began more instructions on the smartphone, you can see the device in the user tab.
ZTE Nubia 5 user manual,ZTE Nubia 5 user guide manual,ZTE Nubia 5 user manual pdf‎,ZTE Nubia 5 user manual guide,ZTE Nubia 5 owners manuals online,ZTE Nubia 5 user guides,

Download ZTE Z998 User Guide Manual Free

Download ZTE Z998 User Guide Manual Free
This is not the first time that the ZTE Z998 smartphone was seen. A filtered back in early June picture, I called on the phone and the Mustang sports AT & T brand . We have not seen an ad for AT & T
Download ZTE Z998 User Guide Manual Free
In addition, he has dropped the code name Mustang and simply called the ZTE Z998 . Outside of AT & T in images, the ZTE site also clearly address this list as AT & T. The media has not yet say when the device will be available . Or for that matter , if you arrive as a prepaid or postpaid device. However , as has been included in the web page ZTE now have a formal set of specifications.
ZTE Z998 will come with a 4.5-inch screen with a resolution of 960 x 540 and powered by a dual -core 1.2GHz processor MSM8930 processor with 1GB of RAM. The phone also has 4 GB of storage space , a slot for microSD card 2070 mAh , 1 -megapixel front and a rear facing 5 megapixel camera with LED flash and 720p video recording .
There will also be the basics such as WiFi 802.11 b / g / n , Bluetooth 4.0 and GPS . ZTE Z998 also has the Jelly Bean operation. Although it will be Android 4.1 . Otherwise, while the specifications are not very high quality , the phone comes with support for LTE . With this in mind , given the level of detail in the ZTE website , it seems that the Z998 will receive an official welcome to AT & T, sooner rather than later.
ZTE Z998 instruction manual – ZTE Z998 or also known as AT & T Z998 was released in August 2013 that the phone function of big business with 4.5-inch screen. ZTE ZTE Z998 or medium Mustang for AT & T 4G LTE network and take 5 megapixel rear facing camera as the primary location . The Z998 Android 4.1 system AT & T run Jelly Bean operating and powered by a dual core processor of 1.2 GHz.
ZTE Z998 user manual,ZTE Z998 user guide manual,ZTE Z998 user manual pdf‎,ZTE Z998 user manual guide,ZTE Z998 owners manuals online,ZTE Z998 user guides,

iPhone ZirhkO v.4 (beta) Free Download Black Theme


ZirhkO beta v.4 : https://dl.dropboxusercontent.com/u/...A9ta%204.0.rar

Here is a beta version of my theme ZirhkO. I always wanted to make a black theme but it is not so easy as I thought .. and as I had a lot of demand I post here.

I continued to work on and I hope it goes some inspired person.

ZirhkO bases v.2 PSD. : https://dl.dropboxusercontent.com/u/...ases%20v.2.rar

Here is the custom iconoclasm layout: https://dl.dropboxusercontent.com/u/...best%201-Z.ra

Rooting Guide For Micromax A51 Bolt First In The World

Disclaimer: This method of rooting micromax A51 worked successfully with my
phone.
Micromax A51 Bolt
Baseband: bcm21553,
Android ver:2.3.7
Kernel version: 2.6.35.7
I am not responsible if it does not work with your phone or if any harm is caused
to your device. Although it is safe.

Requirements:
1. Windows 7/8/xp
2. USB data cable
Softwares and drivers required:
1. USB drivers/ Adb drivers( pdanet)
2. Broadcom drivers
3. Unlockroot.exe ver:2.3.1
4. Any file extractor: Winrar , 7Z etc.
Download Links:
1.Download A51 broadcom drivers from here: (in downloads)
Micromax Bolt A51 | Dual Sim Android Smartphone, Android 2.3 Gingerbread, Buy Smartphones
2.Pdanet installer for win7/8 is here:
Download PdaNet+
Pdanet for WinXp: Download PdaNet
3.Download links for Unlockroot.exe:
unlockroot23 - Download - 4shared
or
unlockroot23.exe
Important:
1. Please disable Antivirus software on your PC until procedure is complete.
So that it does not interrupt driver installation etc.
2. Uninstall Antivirus ,firewall etc applications from your android phone if you
have installed.
3. In your android Go to Settings-Applications and
(a) Tick Unknown sources [√] to allow non market applications.
(b) In Development –Tick USB debugging to allow usb debugging.

Procedure: Now come to Main procedure.

Part 1: Installing USB and ADB drivers: ( With the help of Pdanet)
1. Install pdanet.exe on your pc. Follow the instructions properly.
2. Select other from device list.
3. Window will show security message. Click Install drivers Anyway.
4. Connect your device and pdanet will install USB/Adb drivers for your
device.
5. To confirm, Go to Control panel –Device Manager and you should find
there- Android phone-
-ADB interface.
Part 2: Installing Broadcom drivers:
Note: Please disconnect your phone before installing Broadcom drivers.
1. With winrar or 7z, extract A51driver.rar any where in your pc.
2. There is a zip folder USB install 1.8.6.27 in win7 folder. Extract it.
3. You will get two applications. One for win7 and another for win xp.
4. Double click and install drivers suitable for your window version.
5. Read and follow instructions carefully.
6. Click Install Drivers anyway if Windows displays security message.
7. Now switch off your phone. Take battery out. Re-insert battery. Do not
switch on. Connect your device with USB cable. Window will install drivers
for your device. And show message that Device is connected successfully.
8. If there is any error .Repeat step 7 again. Or Try through other USB ports .
9. If drivers installed successfully then to confirm go to Control panel-Device
Manager and check -PORTs ..There should be displayed Broadcoam Port
no.
Now we are ready to root.
Part 3: Rooting Device:
Note: Disconnect internet connection of pc before installing and running
unlockroot.exe. Otherwise adds , popups etc will disturb you.
1. Switch on your phone normally.
2. Again Check that USB debugging is enabled and Unknown sources
applications are allowed.
3. Install Unlockroot.exe (2.3.1) in your PC.
4. Run unlockroot.exe
5. Connect your A51 with usb cable.
6. Click Root.
7. Click “brcm Micromax A51” in device list.
8. Wait until Root is successful.
9. It will ask to reboot your device. Click yes.
10. Look for superuser app in app drawer.
Congrats you are rooted now.
• Download Root checker from play store to confirm.
• Download Busybox from play store and install in /system/bin.

Micromax A51 Bolt driver here

Micromax A51 Bolt driver here tested this 
see and download Now 

Nokia Q9 (copy) MT6253 dont ON repair to AVATOR BOX - DONE

Phone dont ON


*Read Info:
Code:
-------------------Created: 12.11.2013 13:47:44-------------------

Chip=MTK
Action=ReadInfo
FlashType=NOR
boot=Ver5.1232
Expert Mode=Disable
Range[start]=0x0
Range[size]=0x0
Interface=COM
FlashFile=
Comport=COM4
Baudrate=921600

CPU_Type=MT6253
CPU_ID=0000000F
NOR_ID=00EC240400000000
NOR_Size=16MB
NOR_Name=[SAMSUNG] K5N2833ATB
NOR_DieCnt=
NAND_ID=0000000000000000
NAND_Size=0MB
NAND_Name=Nand:N/A

 Initializing...
 DA_LIB_VER_5.6.1.1
 It is sensing the pinout fast,please hold on the phone Power key
 RXD=1  TXD=3
 Connecting...Please hold on the POWER key until the red gauge is going...
 Any errors please select another boot and try again.
 BB:6253,    HardwareVer:8A00,    SoftwareVer:8A04
 Loading boot...
 INT_SYSRAM_BOOT test completed.
 Loading boot...
 Boot2 test completed.
 Nor Flash ID: 00EC240400000000
 Nand Flash ID: 0000000000000000
 Read Hardware Information is done.
 Config EMI(Nor Flash only)...
 H/W detection ok.
 Get Project ID from phone...
 Project ID: MAUI.09A.W09.52.MP.V3.F1

+++++++++++++++++++End at: 12.11.2013 13:48:17+++++++++++++++++++
*Format FS:
Code:
-------------------Created: 12.11.2013 13:48:34-------------------

Chip=MTK
Action=Format
FlashType=NOR
boot=Ver5.1232
Expert Mode=Disable
Range[start]=0x0
Range[size]=0x0
Interface=COM
FlashFile=
Comport=COM4
Baudrate=921600

CPU_Type=MT6253
CPU_ID=0000000F
NOR_ID=00EC240400000000
NOR_Size=16MB
NOR_Name=[SAMSUNG] K5N2833ATB
NOR_DieCnt=
NAND_ID=0000000000000000
NAND_Size=0MB
NAND_Name=Nand:N/A

 Initializing...
 DA_LIB_VER_5.6.1.1
 Connecting...Please hold on the POWER key until the red gauge is going...
 Any errors please select another boot and try again.
 BB:6253,    HardwareVer:8A00,    SoftwareVer:8A04
 Loading boot...
 INT_SYSRAM_BOOT test completed.
 Loading boot...
 Boot2 test completed.
 Nor Flash ID: 00EC240400000000
 Nand Flash ID: 0000000000000000
 Read Hardware Information is done.
 Config EMI(Nor Flash only)...
 H/W detection ok.
 Get Project ID from phone...
 Project ID: MAUI.09A.W09.52.MP.V3.F1
 Changing baudrate to 921600...
 Done.
 Formatting Flash...
 All Done

+++++++++++++++++++End at: 12.11.2013 13:49:20+++++++++++++++++++

*Repair IMEI
Code:
-------------------Created: 12.11.2013 13:58:45-------------------

Chip=MTK
Action=IMEI
FlashType=NOR
boot=Ver5.1232
Expert Mode=Disable
Range[start]=0x0
Range[size]=0x0
Interface=COM
FlashFile=
Comport=COM4
Baudrate=921600

 Initializing...
 DA_LIB_VER_5.6.1.1
 Tip: The phone must be able to power-on normally
 It is sensing the pinout fast,please hold on the phone Power key
 RXD=1  TXD=3
 Connecting...Please hold on the POWER key until the red gauge is going...
 Any errors please select another boot and try again.
 BB:6253,    HardwareVer:8A00,    SoftwareVer:8A04
 Read info...ok, Waitting enter meta...
 Connected...can release Power button now, tracking...
 Unable to locate LID, Force write...
 Lid=0x2_0x0056, Val=FFFFFFFFFFFFFF0F0000
 Lid=0x1_0x0056, Val=FFFFFFFFFFFFFF0F0000
 Lid=0x2_0x0095, Val=00000000000000000000
 Lid=0x1_0x0095, Val=00000000000000000000
 All done.

+++++++++++++++++++End at: 12.11.2013 13:59:06+++++++++++++++++++
*All done!

Apple iOS 7 Beta 5 iPhone 5


Apple iOS 7 Beta 5 iPhone 5 | 2.37 GB
This is a pre-release version of iOS 5 beta 7 (build 11A4449a) for developers is compatible with iPhone 5


The device, updated to this version of iOS beta 7 can not be restored to earlier versions of iOS.


Download:
Code:
http://uploaded.net/file/r287n4ru/7be5iPhone5.part1.rar
http://uploaded.net/file/5wlu8vq1/7be5iPhone5.part2.rar
http://uploaded.net/file/trvjy7ej/7be5iPhone5.part3.rar
or
http://rapidgator.net/file/b2b6f3ee01d1afd8fe39b5a479b12091/7be5iPhone5.part3.rar.html
http://rapidgator.net/file/7202ccecfc700f1d03e585d7829f4e45/7be5iPhone5.part1.rar.html
http://rapidgator.net/file/62a08825537e03e4441d8fd2ac9914c2/7be5iPhone5.part2.rar.html
or
http://www.secureupload.eu/kjlns7zbbeuu/7be5iPhone5.part1.rar
http://www.secureupload.eu/j21ovluvi9cz/7be5iPhone5.part2.rar
http://www.secureupload.eu/j1utklsjitb1/7be5iPhone5.part3.rar

Apple iOS 7 Beta 4 for iPhone

Apple iOS 7 Beta 4 for iPhone | 4.54 GB

This is a pre-release version of iOS 7 beta for iPhone, iPad, and iPod touch. Devices updated to iOS 7 beta can not be restored to earlier versions of iOS.


Download:
Code:
http://rapidgator.net/file/5c72099e7b80e73e4be971f473fe930c/iOS7eta4.part5.rar.html
http://rapidgator.net/file/84940097133392d81eea904b973c0735/iOS7eta4.part3.rar.html
http://rapidgator.net/file/22f97b987499e42b235524a55264983d/iOS7eta4.part6.rar.html
http://rapidgator.net/file/3dcfdc20073c34b09bea96edc8420c43/iOS7eta4.part4.rar.html
http://rapidgator.net/file/ea5914aa1ecf97195a4504a9f8b4bdfa/iOS7eta4.part2.rar.html
http://rapidgator.net/file/887aeab7ea440b81a9a1c9c0d5539ad3/iOS7eta4.part1.rar.html
or
http://dizzcloud.com/dl/1651fga/iOS7eta4.part5.rar
http://dizzcloud.com/dl/1651fgd/iOS7eta4.part4.rar
http://dizzcloud.com/dl/1651ffp/iOS7eta4.part3.rar
http://dizzcloud.com/dl/1651fft/iOS7eta4.part2.rar
http://dizzcloud.com/dl/1651ffs/iOS7eta4.part1.rar
http://dizzcloud.com/dl/1651ffw/iOS7eta4.part6.rar
or
http://www.secureupload.eu/bxbi4aj1obul/iOS7eta4.part1.rar
http://www.secureupload.eu/ret1w1uoos67/iOS7eta4.part2.rar
http://www.secureupload.eu/zcriglwh5bph/iOS7eta4.part3.rar
http://www.secureupload.eu/pz06385r1rlt/iOS7eta4.part4.rar
http://www.secureupload.eu/d0yu974axzgv/iOS7eta4.part5.rar
http://www.secureupload.eu/b1y7mtpdozxe/iOS7eta4.part6.rar

Smartphone XLS [Spreadtrum] Non More Google Account problem[just One Click] Format OK

>>> USB Pinfind No need Hold Mobile Power key...
>>> Scanning Mobile USB Port...
>>> Detecting COM PortCOM101
>>> Connecting Mobile...
Mobile Connection Success...
Mobile Firmware Version:SPRD3
>>> Downloading First Boot...
>>> Mobile Info
Project ID :Spreadtrum Boot Block version 1.1
>>> Downloading Second Boot...
Baud Rate is Switched To:921600
Flash ID:0000ADBC
Flash Size:20000000->512M
Flash Name:NAND_HYNIXH8BCS0UN0MCR
CPU Name:6820/8810
>>> Auto Formatting ...
Format_RuntimeNV...Fail.
Format_Cache...Fail.
Format_Misc...Fail.
Format_UserData...Success.
All Done...

Motorola XT615 Official Rom (include arabic)

❝Use at your own risk! No liability for damages!/ droidevelopers do not take any responsibilty if you brick or damage your phone using files that can be found on this site. It's all on your own risk❞


Quick Start Guide:

1. RSD Lite installlieren and start
2. Unzip ROM archive
3. Motoluxe in Flash mode (press power, volume down, and camera button at the same time) start and connect to the PC
4. The unzipped ROM file in RSD Lite select and Flash
5. Wait until the operation is finished and restart Motoluxe


RSDLite 6.0 And MTK Patch20 RSD Lite 6.0


Filename: IRM-1670-0-4017-A01_BFM_service.sbf
Creation Date: 04/27/2012 13:36:04
File size: 382013302
RAM DL Version: v0x000000

Android version: 2.3.7
Platform: UMTS MSM7227
HAB Type: Signed Production

Arabic language
IRM-1670-0-4017-A01_BFM_service.sbf


Branding: Retail Germany
Version: 1540-0-4073
Android version: 2.3.7
Bootloader version: N/A

IRM-1540-0-4073-A01_BFM.zip


Branding: T-Mobile Germany
Version: 1540-0-4069
Android version: 2.3.7
Bootloader version: N/A

IRM-1540-0-4069-A04_BFM.zip


Branding: Orange España
Version: 152A-0-4036
Android version: 2.3.7
Bootloader version: N/A

IRM-152A-0-4036-A01_BFM.zip


Branding: Orange France
Version: 152A-0-4034
Android version: 2.3.7
Bootloader version: N/A

IRM-152A-0-4034-A01_BFM.zip


Branding: Personal Argentina
Version: 1590-0-2008
Android version: 2.3.7
Bootloader version: N/A

IRM-1590-0-2008-A06_BFM.zip


The bottom package name: XT615_IRM-154B-0-7009-A02_BFM
Android version: 2.3.7 ( For CEE )
Version number :1-154B-7009
This package features:
BNM bottom package should be a small upgrade of the 1540 version of the release date for 4.19
This version can be used A02 landscaping package
3. Compared with the previous version (1-1540-7009) fluency improved significantly especially unlock the native desktop with native
thanks to backq1

XT615_IRM-154B-0-7009-A02_BFM


Branding:Hong Kong
IRM-1540-0-5013-A05
version number is 1_540_5013 English, Simplified Chinese, Traditional Chinese. Google framework.
At work, so only brush machine, no shots. -
Just comes with the Chinese, with Argentina almost eliminating the need for their finished work.
Than the State Bank, no the few mess - I do not like a few plugs in the bottom bag Landlords and several other applications useless to me, as a relatively clean.


IRM-1540-0-5013-A05_BFM.zip


Branding: CEE Retail
Version: IRM-167A-0-4053-A03_BFM

IRM-167A-0-4053-A03_BFM_service.zip


Branding: CEE Retail
Version: IRM-1540-0-7009-A02_BFM
Android version: 2.3.7
Version Number: 1_540_7009
Date: February 24, 2012

download :IRM-1540-0-7009-A02_BFM password:70111620
This package features:
1. Repair on the version (1_37I_7009) call
Life improved
Than the previous version 115mb switch machine speed optimization, reduced junk software
4. Joined the Task Manager
5. Overall fluency improve stability
The same as the final version number of this end of the package version number with the May 2012 OTA upgrade 6.


Branding: GERMAN
Version:IRM-167C-0-4036-A01
Android version: 2.3.7

download: IRM-167C-0-4036-A01_BFM

RSDLite 6.0 And MTK Patch20 RSD Lite 6.0

IR-Key Suit 4.9.6 Released. HTC One dual Change imei CID,Install Auto Recovery

"IR-Key Suit" version 4.9.6 Released

ADD:

Installation Of Automatic Recovery

See thevideo tutorial


HTC ONE 802d (m7cdwg)

S-OFF (V1.29)

Change CID (S-OFF)

Change 2 IMEI (S-OFF)
***************


HTC ONE 802t (m7cdcg)

S-OFF (V1.29)

Change CID (S-OFF)

Change 2 IMEI (S-OFF)
****************


HTC ONE 802w (m7cdug)

S-OFF (V1.29)

Change CID (S-OFF)

Change 2 IMEI (S-OFF)
****************

Resolve some of the problems, and the addition of some options, such as:
Mount System, Remember to read and copy data.


******************************************


ROM Karbonn A9+/Flare ICS to JB {Tutorial} (Links Posted)

I found the tutorial on Facebook. Took a risk for testing . Modified a bit to suite our needs. Credit goes to original developer.


If procedure not followed properly, it may brick your phone. Go ahead with your own risk.

Requirements:

Win XP or Win 7 (all tools set to Win Xp Sp3 Compatibility & Run as Admin), Battery atleast 60%

Required Files:

Karbonn Drivers: download

Roadkill: Download

EMMC Downloader: Download

QUALFAST: Download

IMEI Writer: Download

JB Root: Download

AP Firmware: Download Part 1 Download Part 2

BP Firmware: Download 

ROM Karbonn A9+/Flare ICS to JB {Tutorial} (Links Posted)

Procedure

(160, 82, 45)"]1.Backup your ICS using Roadkill

Turn off your karbonn A9+ or Flare, then press Volume down and power button at the same time. once you see the “ENTRY QPST DOWNLOAD”, open roadkill and click on Store Image Tab, select the disk with 3.61GB, click browse and select the location where you want your backup to be saved, and click start. Once finish proceed to next step.


[COLOR="rgb(160, 82, 45)"]2. Saving IMEI, MAC ID and Serial Number[/COLOR]

Write your IMEI1, IMEI2, Wi-Fi Mac, and Serial Number (S/N) in a piece of tissue paper. For MAC ID, turn on your Wi-Fi, and go to Settings > About Phone > Status. For IMEI just dial *#0000# in dial pad.

3. Backup NVRAM

1: Run EMMC_DownLoad_V1.2.3.exe ,(Check Download Boot Loader for 1st run)

2: Turn device ON (make sure USB Debugging is enable)

3:Connect phone thru microUSB cable (Note: Make sure there are no other USB Modem or phone connected to your computer except for Karbonn a9+ or Flare)

4: Click BackUp_NV.

5: Wait until back up is successful


[COLOR="rgb(160, 82, 45)"]4. Download BP Firmware [/COLOR]

1: Go to ENTRY QPST DOWNLOAD” Mode (Power + Vol Down)

2: Run EMMC_DownLoad_V1.2.3.exe. Click SELPATH select “BP Firmware” Folder.

3: Connect phone thru a microUSB cable.

4: Check Device Manager for "Qualcomm HS-Usb Diagnostics 9006" Com Port #.

5:Look for "Qualcomm HS-Usb Diagnostics 9006" type the Com port # in EMMC Download Box. Click Download.

6:Wait until download is successful (Usually it takes 6-12sec). Remove battery. (Do not Close EMMC Download. then proceed to next Step )


[COLOR="rgb(160, 82, 45)"]5. Download AP Firmware [/COLOR]

1: Run QUALFAST2.0.5.exe. Click SELPATH, select AP firmware (“Stock JB Rom” Folder), Check Format Card & Userdata

2: Go to Fastboot Mode or Green Screen Mode (Power + Vol Up)

3: Click OK to start download then connect phone via a microUSB cable.

4: Wait until download is successful. Remove battery.


[COLOR="rgb(160, 82, 45)"]6. Restore NVRAM Backup[/COLOR]

1: Run EMMC_DownLoad_V1.2.3.exe.

2: Turn device ON. (make sure USB Debugging is enable)

3: Click Restore_NV. Browse and select bak.qcn file. Connect phone thru microUSB cable.

4: Wait until qcn restore is successful. (your IMEI 2 is Null & Wifi Mac Address is set to default. you need to write it again)


(160, 82, 45)"]7. IMEI & Wi-Fi MAC Address Writing

1: Turn device ON (make sure USB Debugging is enable)

2: Locate your modem com port number (Go to Device Manager > Right-click “Tianyu HS-USB Android Modem 9025” > Properties > Advanced Tab > Advanced Port Settings > COM Port # (Ex. 10))

3: Open Qualcomm_Modem_Tools_V1.1.2.exe and type com port #

4: Write all your backup code, then click Write button. (In my case I have re-entered my IMEI1, IMEI2, S/N (Serial Number), Wi-Fi MAC)

Note: Every after successful entry of IMEI, the phone automatically restarts.


8. Rooting

1: Restart Device. Wait until it boot perfectly.

2: Copy update.zip to internal memory.

3: Reboot to recovery and update from internal sdcard.

4: Reboot

5: Enjoy.

How To Install a custom Rom Karbonn A15 Procedure Here Step By Step 100% Done

Here i am posting How To Install a custom Rom in Karbonn A15
Step By Step And guys its Alrdy Tested By Me
and say Thanks For Orignal Poster

-----------------------------------------------------------------------
How To Install a custom Rom

how to root this device

How To Install Cwm Recovry

Let"s Start
----------------------------------------------------------------------
ROOT the Karbonn A15

1. Enable USB Debugging - Under SETTINGS - DEVELOPER OPTIONS

2. Download Driver and Install it
you can download it from here pcdrivers.zip

3. download "Android Root Unlock" from Android Root Unlock | Free software downloads at SourceForge.net and extract it

and run the batch file ICS_Root_Unlocker.bat
the batch file will reboot your phone a couple of times and will wait with a message "Press Any Key to continue"
IMP NOTE : if you pc is saying "PRESS ANY KEY" note if your phone is on or rebooting....
if it is Rebooting, wait for it to start before pressing a key
5. After a couple of boots the phone will be rooted
6. verify that the Root is complete by observing a "Superuser" shortcut in the application list And its done
------------------------------------------------------------------------
Install Cwm Recovery

1. Download the zip from here CWM5.0.2.8recovery - Download - 4shared
2. Extract the zip in a folder.
3. put ur phone in fastboot mode Use the key Vol Up + Pwr
4. Run CWM Recovery.bat and follow the simple steps

For Enter In cwm recovry Modepress and hold vol up and pwr key
it will show fastboot recovery in green display be patient dont leave the keys until it shows recovery Mode ( Cwm Recovry mode )

--------------------------------------------------------------------------
install Custom Rom
Now You Can Install Custom Rom In Ur Karbonn A15
Installation Instructions:
1 .Download Rom From here ICS_Tweaked_A15_SMD.zip
2. Put ur phone in recovry mode
3. select
install zip from sd card and select ICS_Tweaked_A15_SMD.zip
4.
Wipe Data/Factory Reset
5. Reboot

Done enjoy
If you face any problm pls post here
and dont forget use thanks button if you like my post

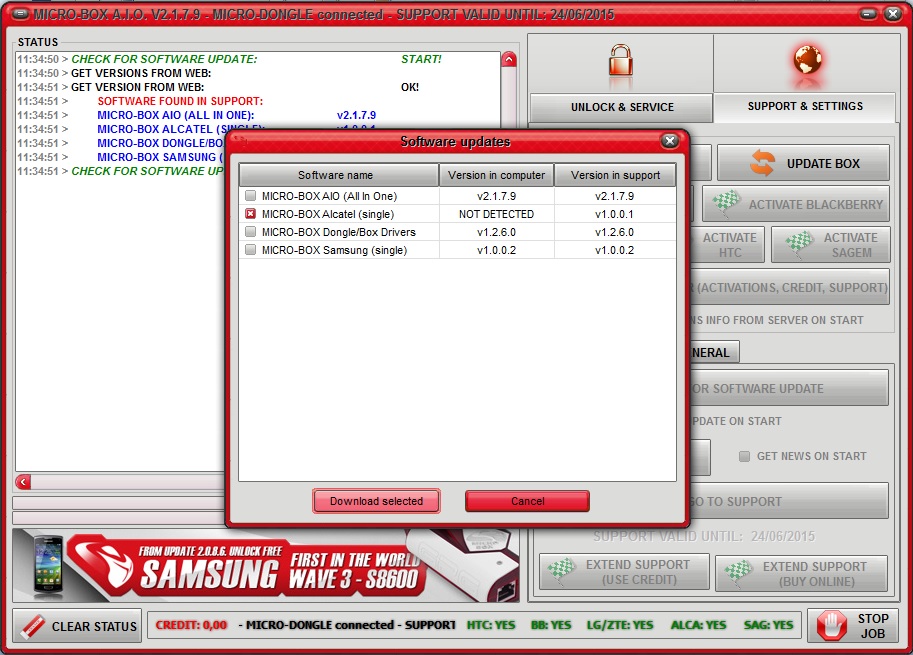
11 November 2013 - Micro-Box AIO V2.1.7.9 - ADDED DETECTION FOR NEW SINGLE SOFTWARE


11 November 2013 - Micro-Box AIO V2.1.7.9


ADDED DETECTION FOR NEW SINGLE SOFTWARE UPDATES when press CHECK SOFTWARE UPDATE!
Some other small improvements!


#1 CHECK IT HERE =>#1 SUPPORT WITH VIDEO TUTORIALS !!!


#1 CHECK IT HERE =>#1 REALTIME update of SUPPORTED MODELS list ! INCLUDED VIDEO LINKS !


MICRO BOX V2.0 THE BEST MULTI PLATFORM UNLOCKING TOOL ! - MICRO-BOX FULL ACTIVATED
 

Android Download Manager [ADM] V1.1

Android Download Manager [ADM] V1.1

A Software to Download
Android Models Flashers, Flash Files and Drivers

MediaFire Download Link

[Android] Sygic GPS Navigation 13.2.2 / 2013.06 Maps

[Android] Sygic GPS Navigation 2013.06 Maps
Requirements: Android v2.1 and higher, supports App2SD
Operating System:Android
Overview: Europe, North & South America , Southeast Asia


Download Instructions:
The download link/links will be at the bottom
of the page that opens. Click the single downward pointing arrow. "Download" to download the map. “DO NOT CLICK “ALL PARTS”
Extract to folder

Install Instructions
1. Copy Sygic folder to SD card
2. Copy downloaded maps to Sygic/Maps
3. Install fom SD card Sygic 13.2.2
4. Reboot/open program/have fun

NOTE; Favorites are stored in folder /Sygic/Res/db as items.dat

Sygic Navigator 13.2.2 full .apk Program [220 MB]

Africa:
Angola , Benin , Botswana , Burkina Faso , Cameroon , Democratic Republic of Congo , Egypt , Gabon , Ghana , Kenya , Lesotho , Malawi , Mali , Mauritania , Mauritius , Mayotte , Mozambique , Namibia , Niger , Nigeria , Republic of Congo , Reunion , Senegal , South Africa , Swaziland , Tanzania , Togo , Uganda , Zambia , Zimbabwe
Africa

Asia
Thailand, Hong Kong , Macau , Taiwan, Vietnam, Indonesia, Singapore & Malaysia
Asia

Australia_New_Zealand

Benelux

DE_AT_CH

Europe:
Andorra , Austria , Belgium , Bulgaria , Canary Islands , Croatia , Cyprus , Czech Republic , Denmark , Estonia , Finland , France , Germany , Gibraltar , Greece , Hungary , Ireland , Italy , Latvia , Liechtenstein , Lithuania , Luxembourg , Malta , Monaco , Netherlands , Norway , Poland , Portugal , Romania , Russia , San Marino , Slovakia , Slovenia , Spain , Sweden , Switzerland , Turkey , Ukraine , United Kingdom , Vatican
Europe

[b]France b]

Greece

Iberia

Italy

Middle East:
Bahrain , Kuwait , Oman , Qatar , Saudi Arabia , United Arab Emirates
Middle East

North America:
Alabama , Alaska , Arizona , Arkansas , California , Canada ,Colorado , Connecticut , Delaware , Florida , Georgia , Hawaii , Idaho , Illinois , Indiana , Iowa , Kansas , Kentucky , Louisiana , Maine , Maryland , Massachusetts , Mexico, Michigan , Minnesota , Mississippi , Missouri , Montana , Nebraska , Nevada , New Hampshire , New ****** , New Mexico , New York , North Carolina , North Dakota , Ohio , Oklahoma , Oregon , Pennsylvania , Puerto Rico , Rhode Island , South Carolina , South Dakota , Tennessee , Texas , Utah , Vermont , Virginia , Washington , West Virginia , Wisconsin , Wyoming
North America

Scandinavia

South America:
Argentina , Brazil , Chile, Uruguay, Colombia, Venezuela
South America

Turkey

United Kingdom and Republic of Ireland

Western Europe

All Qualcomm Android Flash Tools

Qualcomm Android Flash Tools
tested and good tool download now 
any problem comment plz 
i solve your problem 
tnx


1000% Free Enjoy

Download Here

Good News GPG Dragon Improved Password Algo for Coolsand in Coming Update

GPG Dragon/Dongle Software Improve Password Algo for Coolsand in Next coming Update
Now no more wrong Coolsand Password

Test Report:-
Current Dragon Ver show wrong Password


Test Report with New coming Update

Password Read 100% ok(77799)

Flash file link:-440
I checked More than 10 set and result 100% ok

More Test report:-
rda 8851a RDA CHIP succesful readflash but password read false
check his password


@All
This is just Test report(Wait till final ver release)
so don't spam here(request software /when will release etc)

rda 8851a RDA CHIP succesful readflash but password read false

product supporter plz do work for this 8851a
rda chips c8 4mb flash read ,after read i put file in password is 1234 but when i type in mobile the password incorrec


Asansam Box Ver 2.3.9 and All in One Rev 1.0.0 Released

First In The World Again
And
Completely Separate
From
ASANSAM TEAM


More info and discussion here

Samsung I8190 imei repair done

Selected model: I8190
Selected port: COM177 Z3X BOX Serial Port
Selected port speed: 115200
Reading phone info...
Model: GT-I8190
Android version: 4.1.1
Product code: GT-I8190RWAXFA
Phone version: I8190XXALJL
PDA version: I8190XXALJL
CSC version: I8190OJVALJ9
IMEI: 354784
Phone S/N: R21CB54QLEJ
Checking Super user right... true
Reading data from phone... OK
Now connect phone to UART cable
Checking phone at COM177 OK
Bypass MSL... OK
Repairing IMEI... OK
Repair done
Done with Samsung Tool v.16.1

Asansam Box Ver 2.3.9 and All in One Rev 1.0.0 Released

Asansam Box Version 2.3.9


First In the World Again
And
Completely Separate
From
ASANSAM Team


Add RESTORE PB


GT-i9195L One Click Restore PB
GT-i9195T One Click Restore PB
GT-i9197 One Click Restore PB
GT-S7270 One Click Restore PB
GT-S7275 One Click Restore PB
GT-S7272 One Click Restore PB
GT-N9000 One Click Restore PB
GT-N9002 One Click Restore PB
GT-N9005 One Click Restore PB
GT-N9006 One Click Restore PB
SM-N900T One Click Restore PB
SM-N900P One Click Restore PB
SM-N900A One Click Restore PB
SM-N900V One Click Restore PB
SM-N900R4 One Click Restore PB
SM-N9008 One Click Restore PB
SM-N900J One Click Restore PB
SM-N900K One Click Restore PB
SM-N9009 One Click Restore PB
SM-N900S One Click Restore PB


About Restore PB
please read carefully before use this button = Risk
This option and Button is for only phones that startup is ok but when go to recovery mode show u E: failed to mount /efs (Invalid argument) or Not show EFS block in mount command
Please read manual before use this button

http://forum.gsmhosting.com/vbb/f716/warning-please-read-post-before-use-restore-pb-warning-1661676/


ALL IN ONE REV 1.0.0

Asansam box full setup(Asansam 2.3.9 and ASF 1.1.3)


About Asansam ALL IN ONE
Unistall and remove all about asansam and asf and
then install All in one


About support files server

ASANSAM Server Working now!!!
without any problem with high speed and Powerful


All thanks and Useless Posts after Release new updates Deleted


Download
============
ASANSAM_ALL-in-One_Rev1.0.0.exe

Nokia Lumia 520 flashing successfully

Core : v1.64 , WP8x FlashEngine : v1.7

FFU : 7B8D6972_RM914_1030.6409.1314.1001_RETAIL_im_mea3_ 319_01_169866_prd_signed.ffu
Checking FFU file, wait...
FFU Revision ID : 2.0
FFU Model ID : Nokia.MSM8227.P6036
FFU RootKeyHash : F771E62AF89994064F77CD3BC16829503BDF9A3D
FFU Languages : Arabic , Belorusian , Danish (Denmark) , English (UK) , English , Filipino (Philippines) , Finnish , French , German , Hindi (India) , Indonesian , Italian , Japanese , Korean , Malay (Malaysia) , Persian (Iran) , Polish , Portuguese(Portugal) , Russian , Chinese , Slovak , Slovenian , Spanish(Mexico) , Spanish , Swedish , Thai , Chinese(Taiwan) , Turkish , Vietnamese ,
FFU ChipSectors : 7557120
FFU Header : 0x000C0000
FFU Payload : 0x4B160000
FFU FastVerify : Ok

Waiting for phone...
Dead mode is selected , no phone in normal mode found
1. Press and hold : "Volume Down" + "Power On"
2. Insert USB cable
3. When cable connected and you feel short vibra - release buttons

Device catched in BOOT mode!
Boot Mode confirmed!
Setting Preloder
Collect Info...
Setting Application
Setting Secure
Collect Info...
=== Nokia Flash App info :
Protocol Version : 1.12
Protocol Implementation : 1.23
=== Phone Initial info :
Phone RMxxx ID : RM-914
Phone Model ID : Nokia.MSM8227.P6036.1.2
Phone Model PC : 059S3W7
Phone IMEI : 355910057382419
=== Security Initial info :
Security Status : 010100000101
Secure FFU Status : 000000000000
Device RootKey : F771E62AF89994064F77CD3BC16829503BDF9A3D
=== Other info :
SD present : False

FFU : 7B8D6972_RM914_1030.6409.1314.1001_RETAIL_im_mea3_ 319_01_169866_prd_signed.ffu
Checking...
Device RootKey Match with FFU RootKey!
Device ProductID Match with FFU ProductID!
ProductID : Nokia.MSM8227.P6036
DevRKH : F771E62AF89994064F77CD3BC16829503BDF9A3D
All Ok, Continue flashing...

Perform Data Partition Erase
Erase done

FFU : 7B8D6972_RM914_1030.6409.1314.1001_RETAIL_im_mea3_ 319_01_169866_prd_signed.ffu
Flashing FFU
Sending FFU Header Data...
Header sent , accept$
Sending FFU Payload Data...
Finishing flashing

Flashing done!
Green Light
Total flash time : 00:03:40

Rebooting

Connect phone on selected interface...

Miracle Box 1.64 SPD-MTK-COOLSAND (10th November 2013) Discussion Thread

Sptbox deluxe 16.9.2 released!!!!

NEWS:
* SM-G3502U Flash/Unlock/IMEI
* SM-G3502 Flash/Unlock/IMEI
* GT-S7273T Flash/Unlock/IMEI
* GT-I9158 Flash/Unlock/IMEI
* SM-N9006 flash
* SCH-I545 flash
* SHV-E330S flash
* SM-N9002 flash
* SM-N900L flash
* SM-N900K Flash
* SM-N900S Flash
* Repair GT-I9305 3G/4G
* Repair GT-I9505 3G/4G
* SM-N900W8 FLASH
* SM-N900T FLSAH
* SM-N9008 Flash
* GT-S5282 Flash
* SM-N900 Flash
* GT-I8552B Region Change
* GT-N7100 Region Change
* N900t N900w8 Region change


Alternative Download Link 1#:
http://support.sptbox.com/SPTCARD1692.rar

Alternative Download Link 2#:
http://support.sptbox2.com/SPTCARD1692.rar

P.S: Flash file still uploading. And we not write anymore first in world coz now our client know what is first in world we do ..

Samsung Infuse 4G SGH-I997: How to root and install ClocRecovery on UCLB3 firmware

Download Odin3 1.7 (Odin3 v1.7.zip, 193 kB) to your computer.
Download one of the following pre-rooted UCLB3 firmware packages:
I997UCLB3-root.rar (173 MB) –If you only want rooted stock kernel and stock recovery
I997UCLB3-root-deodex.rar (174 MB) — If you want rooted stock kernel, stock recovery, deodex, zipalign, and BusyBox
I997UCLB3-CWM-root-deodex.rar (174 MB) — If you want rooted stock kernel, ClockworkMod Recovery, deodex, zipalign, and BusyBox
I997UCLB3-CWM-root-deodex-extras.rar (168 MB) — This is the recommended package. Get this if you want a pre-rooted custom kernel (Entropy’s Daily Driver), Red ClockworkMod Recovery, deodex, zipalign, BusyBox, no bloatware, and a few extra goodies (e.g., fix for scrolling wallpaper, CRT off animation, 8 lock screens, extended power menu, and accurate battery mod).
Instructions

Using WinRAR or similar software, extract the RAR package that you downloaded. Extract the archive into a folder on your computer, preferably the Desktop, where you can easily find the extracted file. You should be getting one file with a *.tar.md5 extension.
Extract Odin3 v1.7.zip into a folder on your computer.
Turn off your phone and make sure that it is not connected to your computer.
Boot your Infuse 4G into recovery by holding down the Volume Up, Volume Down, and Power buttons at the same time. When you see the Samsung logo, release the Power button. In recovery, use the Volume buttons to navigate and the Power button to select options.
Select the Wipe All User Data option. This won’t affect any files on your SD card. Confirm data wipe by selecting Yes on the next screen.
Select Wipe All Cache Data.
Select Reboot system now and allow your phone to reboot normally.
After the phone has completely booted, turn it off completely again.
On your computer, run Odin3 by double clicking on Odin3 v1.7.exe.
Click the PDA tab in Odin3 and select the *.tar.md5 file that you extracted from the RAR package.
Connect the USB cable to the computer.
While holding down the Volume Up and Volume Down buttons on your phone, plug the other end of the USB cable into your phone. This will place the phone in Download Mode. In Odin3, you will see an “Added!” message, indicating that the device is recognized. If you do not see this message, reinstall the device drivers or check that you enabled USB debugging.
Click START in Odin3 to start flashing the kernel. Wait for it to finish.
Once the flashing is done, your device will automatically reboot. You should get a “PASS” message on the Odin3 window, indicating that the flashing was successful.
However, if you get a “FAIL” message on the Odin3 window, disconnect the phone from the computer, close Odin3, remove your phone’s battery, re-insert the battery, start over from step 3.

How to Update Samsung Infuse 4G i997 to Jelly Bean 4.1 via Cyanogenmod 10

Follow this guide to install Jelly Bean 4.1.1 via Cyanogenmod 10 on Samsung Infuse 4G i997.
Disclaimer : The Procedure described in this article are risky & can cause damage to your device. You should not try to attempt this if you are not aware of these things. Please follow this guide completely at your own risk. If any damage happened to your device while following this tutorial, neither we nor developer should be held responsible for the same.

Please note that, this update of Cyanogenmod 10 is applicable only for Samsung Infuse 4G bearing model number I997. DON’T try it on any other device, it may cause damage to your phone..
Pre-Requisites before installing Cyanogenmod 10 :
Charge your device upto 60% battery level so that installation procedure won’t be interrupted.
You will have to wipe all the data (excluding SD card) before installing this custom ROM update. Therefore it is highly recommended to Backup all your data from phone memory which includes contacts, messages (SMS/MMS), call logs, Internet APNs etc.
Enable USB Debugging option in your phone which can be found out here : “Settings->Applications->Development->USB Debugging”
Procedure to Update AT&T Samsung Infuse 4G I997 with Cyanogenmod 10 :
Before proceeding to the actual installation procedure, ensure that your device is running Android 4.0 (ICS) ROM & has custom recovery installed in it. Please don’t proceed further if your phone doesn’t meet above 2 requirements.
Download latest Cyanogenmod 10 package from the official development page (link is mentioned below) :


Infuse 4G Cyanogenmod 10
(Optional) Download Google Add-on Apps (Gmail, Maps, GTalk, Play Store etc.) which need to be flashed manually since they are not present in the ROM by default.
Google Apps (Jelly Bean).
After downloading CM10 & Google Apps, connect your device to PC. Enable mass storage mode on it. Now copy Cboth the files to your device’s SD card.
Disconnect it from computer. Boot in recovery mode on your phone. To do so, switch off the phone completely. Press & hold Volume Up + Volume Down + Power Key together until recovery mode appears (you may release power button after Samsung logo but keep holding other two).
Take a nandroid backup of your current ROM so that it can be restored back (in case if anything goes wrong). To backup your current ROM, select Backup and Restore option from the recovery mode & on next screen, select backup. Now It will make a nandroid backup of your whole system (excluding SD card). Wait for the backup process to get finished.
Select wipe data/factory reset & wipe cache partition to wipe all the data & caches from the phone memory respectively.
Now Select “install zip from sdcard” followed by “choose zip from sdcard“. Navigate the ROM file (which you’ve transferred earlier) Select it & press on ‘Yes‘ to continue. ROM installation process will start.
Wait for the ROM to get installed. After ROM gets successfully installed, your phone will land in the recovery mode again.
(Optional) The same procedure you have to do for installation of Google Apps (Don’t wipe the data again). After you finished installation of Gapps, press back button to go to main menu of CWM.
Select reboot system now from the recovery mode to Restart the phone.
Congratulations !! You’ve successfully updated your Samsung Infuse 4G with the Jelly Bean based custom ROM (Cyanogenmod 10). Keep visiting the official development page for the latest updates & if you have any issue regarding this procedure, comment it below, we will try our best to sort out the same.
Tip: In case if you want to revert back to your previous ROM , enter into recovery mode (mentioned above), from the main menu, select Backup and Restore option & on next screen, select restore & choose your latest backup to restore.

Remove or read Pattern Lock first time with miracle team

Remove or read Pattern Lock first time with miracle team
read for more info Miracle Advanced Android Tool Addon Miracle Box

Supports :
All Android Devices
Supports conenction
Normal Mode : Usb Debug Enabled
or
Recovery Mode : Recovery Mode - you can read info and use even in recovery mode
--------------------------------------------
- One click Read full info
show all device information
Show su Binay Version
Show BusyBox Version
- One Click Reboot :
Reocvery, Download
Boot-Loader,Turn off
- One Click Wipe phone in adb mode
- One Click Wipe phone in Fastboot mode
(all htc , chinese tabs etx)
- One Click Crack pattern Lock
- One Click Read Pattern Lock
- One Click Remove Password Lock
- One Click Remove Gmail Lock
- One Click Read Gmail Id
- One Click Install Any Apk
- One Click Flash Zip file
- One Click Remove pattern Lock
- One Click Get Memory Status
- One Click Fix Permission
- One Click Get adminstrators mode
- One Click change Default Memory to
Sd or Internet ( No Root Needed )
- One Click Remove pattern Lock
- One Click Remove Battery Status
- One Click Backup contacts
(sometimes Root Needed) only Android 4.x.x
- One Click Backup Sms
(sometimes Root Needed) only Android 4.x.x
- One Click Backup system apps
sometimes Root Needed) only Android 4.x.x
- One Click Backup All Apps
sometimes Root Needed) only Android 4.x.x
- One Click Restore Backup
sometimes Root Needed) only Android 4.x.x
- One Click Remove Safe Mode
sometimes Root Needed) only Android 4.x.x
- Key Tool ( Very useful when
toucscreen or buttons are damaged )
- Fastboot tools
one click Read full info
one click Reboot normal to fastboot mode
one click Reboot fastboot to normal mode
one click wipe device in fastboot mode
one click se/huawei bootloader unlocker by offical bootloader unlock code
- Fastboot Flasher
one click Flash Boot image
one click Flash Splash Image
one click Flash Hboot Image
one click Flash Radio image
one click Flash Recovery image
one click Flash Zip file in fastboot mode
- Erase Functions
one click Erase Boot
one click Erase Radio
one click Erase Boot
one click Erase all (Not erase Sdcard)

Miracle Advanced Android Tool Addon Miracle Box

Miracle Advanced Android Tool Add on Miracle Box & Eagle Eye

Read Info


Pattern Lock Display First Time
No Need to Unlock


Remove Pattern Lock


Remove Google Account


Backup Phone Book
First Time


Backup SMS


Save Phone Book and SMS DATA


Reboot Normal to Fast Boot


Fast Boot Info


Reboot Fast Boot to Normal Boot


See Mobile Memory Status


Latest Update Info


Details Features
Code:
Miracle Advance Android Tool V1.0
by Miracle Team
www.miracleserver.com
--------------------------------------------
Supports :
All Android Devices 
Supports conenction 
Normal Mode     : Usb Debug Enabled
or
Recovery Mode   : Recovery Mode - you can read info and use even in recovery mode 
--------------------------------------------
- One click Read full info 
    show all device information 
    Show su Binay Version
    Show BusyBox Version
- One Click Reboot : 
    Reocvery, Download
    Boot-Loader,Turn off
- One Click Wipe phone in adb mode
- One Click Wipe phone in Fastboot mode 
   (all htc , chinese tabs etx)
- One Click Crack pattern Lock 
- One Click Read Pattern Lock 
- One Click Remove Password Lock 
- One Click Remove Gmail Lock 
- One Click Read Gmail Id 
- One Click Install Any Apk 
- One Click Flash Zip file
- One Click Remove pattern Lock 
- One Click Get Memory Status
- One Click Fix Permission
- One Click Get adminstrators mode
- One Click change Default Memory to 
  Sd or Internet ( No Root Needed )
- One Click Remove pattern Lock 
- One Click Remove Battery Status
- One Click Backup contacts 
 (sometimes Root Needed) only Android 4.x.x
- One Click Backup Sms 
 (sometimes Root Needed) only Android 4.x.x
- One Click Backup system apps 
  sometimes Root Needed) only Android 4.x.x
- One Click Backup All Apps 
  sometimes Root Needed) only Android 4.x.x
- One Click Restore Backup 
  sometimes Root Needed) only Android 4.x.x
- One Click Remove Safe Mode 
  sometimes Root Needed) only Android 4.x.x
- Key Tool ( Very useful when 
  toucscreen or buttons are damaged )
- Fastboot tools 
   one click Read full info 
   one click Reboot normal to fastboot mode
   one click Reboot fastboot to normal mode
   one click wipe device in fastboot mode
   one click se/huawei bootloader unlocker by offical bootloader unlock code
- Fastboot Flasher
   one click Flash Boot image
   one click Flash Splash Image
   one click Flash Hboot Image
   one click Flash Radio image
   one click Flash Recovery image
   one click Flash Zip file in fastboot mode
- Erase Functions
   one click Erase Boot 
   one click Erase Radio 
   one click Erase Boot 
   one click Erase all (Not erase Sdcard)


All Software Here Headline Animator

Please Log in